(More format) |
No edit summary |
||
| (One intermediate revision by the same user not shown) | |||
| Line 55: | Line 55: | ||
Once you have your .rsi set up, you can then go to the previously mentioned '''Prototypes''' folder and write out all the .yml files needed for your item. Read about how to contribute for further information (this part is incomplete.) | Once you have your .rsi set up, you can then go to the previously mentioned '''Prototypes''' folder and write out all the .yml files needed for your item. Read about how to contribute for further information (this part is incomplete.) | ||
Latest revision as of 17:57, 4 February 2024
This is a guide to spriting for SS14 and the general expectations for spritework on Delta-V.
You will mainly be using the art program of your choice, but it will help to have your own repository and development environment so that you can test your sprites and eventually add them to the game. For information about dev environment setup, see Mapping.
Basics of Spriting
Getting Set Up
To begin, you will need a digital art program. There are many free programs such as Krita or GIMP that can be used to make sprites. The most important things to look for when choosing a program for spriting is you will want something that supports layers and transparency (no MS Paint), and you will want a program that comes with a 1x1 pixel brush.
Most of what you will be spriting will be 32x32 pixels because each tile in the game is 32x32. It gets more complicated when you are spriting something that has multiple states (such as a sprite that faces different directions), when you are spriting larger objects, or when you are spriting something animated. Most sprites related to the player character for example (such as clothing or customization options), will be 64x64 because the player character can face four directions.
Simple Spriting Tutorial
I will now go over the steps involved in spriting a simple clothing item. The program being used in this tutorial is Krita, but as mentioned earlier, other art programs will work too as long as they support layers and pixel art. For clothing items such as this, make sure you are working in 64x64.
Layer Setup
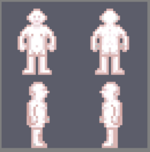
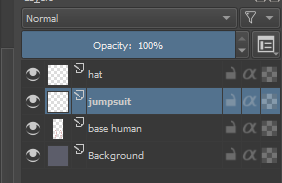
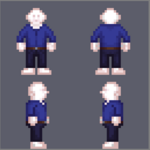
The first thing you will want to do is set up your layers in your digital art program. The background layer should be a neutral grey tone, similar to the floor tiles on the station, so that you can get a good idea of what the sprite will look like in-game. The layer above that should be the base human sprite, then each layer above that will be different clothing items. Make sure if you are spriting multiple pieces of clothing at once, that they are in seperate layers, so then you can export each item separately.
Color and Outlines
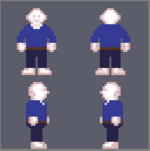
Now we are going to put some clothes on him. Choose whatever colors you have in mind for your clothing item and draw it out on the appropriate clothing layer. Remember to use a 1x1 pixel brush too. Finer details, shading, and outlines don't need to be added at this stage. Just lay out the base colors of your sprite. Make sure that each part of the sprite (sleeve, belt, patterns, etc.) stays consistent no matter which direction the sprite is facing.
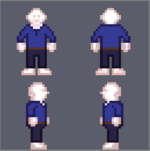
Once you get the base colors laid out, you should then add outlines. The outlines should not be just black, but should instead be a darker shade of the base color. The outline should also mainly just be on the outer edge of the sprite, because it helps the sprite stand out.
Shading and Finer Details
Finally, you will add shading to the sprite. Imagine a light floating above and around your sprite and casting shadows onto it. Use a shade in between your outline color and your base color to add the shading in areas that would logically be shaded. You can also make the outline slightly lighter in areas that would be hit by light. The outline should never be lighter than the base color, however.
Additionally, use higher contrast shades to make sure the shading and outline combined give a good idea of the shape of the object. Too low of contrast and you risk having your sprite look flat and dull.
Exporting Your Sprite
Once your sprite is done, in whichever art program you are using, make sure all layers except for the layer with the sprite you're exporting are invisible. Layer visibility can be toggled in the layer menu as shown above. Once you have your sprite alone over just a transparent background, it is then ready to be exported.
Putting Your Sprites in the Game
If you are making sprites to be put in the game, ideally you should already have a development environment and repository set up.
In your repository there will be a Resources folder containing two other folders; Prototypes and Textures. These are the two folders you care about for spriting.
In Textures, you will see sprites organized by what their purposes is (Clothing, Mobs, Objects, etc.) or organized by what codebase they're from (DeltaV, Nyanotrasen, Simplestation).
Go further into any of these and you will see each item has its own .rsi file. You will need to make your own .rsi file in its appropriate folder, then put any sprites related to your new item (icon sprite, inhand sprites, equipped sprites, etc.) in the .rsi file. You can use pre-existing .rsi files as reference to see how it's organized.
Additionally, you will need a meta.json file inside the .rsi. The meta.json file will contain copyright information, as well as information that tells the game how to render these sprites. Again, reference pre-existing meta.json files to understand how it works.
Once you have your .rsi set up, you can then go to the previously mentioned Prototypes folder and write out all the .yml files needed for your item. Read about how to contribute for further information (this part is incomplete.)
